
- Like
- Digg
- Del
- Tumblr
- VKontakte
- Buffer
- Love This
- Odnoklassniki
- Meneame
- Blogger
- Amazon
- Yahoo Mail
- Gmail
- AOL
- Newsvine
- HackerNews
- Evernote
- MySpace
- Mail.ru
- Viadeo
- Line
- Comments
- Yummly
- SMS
- Viber
- Telegram
- Subscribe
- Skype
- Facebook Messenger
- Kakao
- LiveJournal
- Yammer
- Edgar
- Fintel
- Mix
- Instapaper
- Copy Link
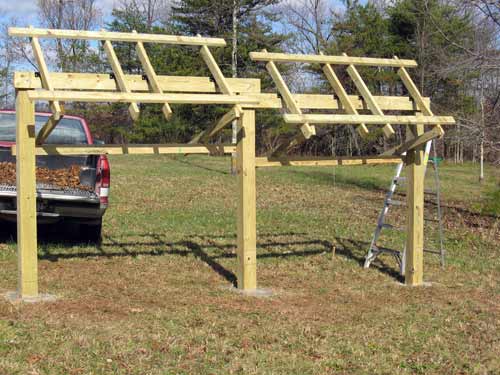
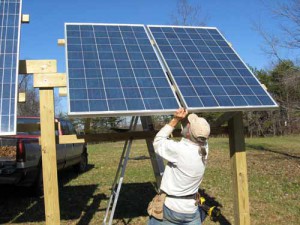
Racks ready for panels. Click here to view additional photos and variations of this solar panel rack, including an all metal design inspired by the wood version
Mary and I live off grid, so we wanted to mount our panels near ground level, where we could easily keep the snow off (i.e., not on a two story tin roof) and adjust the panel angle seasonally, because every watt is sacred in a non-grid-tie system, especially December through February in WV. Also, the panels would be more efficient in warm weather (due to being cooler than if mounted on a hot tin roof). We didn’t want to spend a lot of money on a pole-mount rack, so I came up with a simple design that we built from treated lumber, common hardware and hinges.
Four local families have built similar racks modeled on this design (up to 24 panels – see this gallery). We have four panels, mounted in two pairs, where each pair adjusts individually. Critical joints (2×6 and 2×4 boards to 6×6 posts, hinges to beam) are made with nuts, bolts and washers through drilled holes for strength, though we did use 2 1/2″ wood screws (and a power driver) for fastening the hinges to the narrow edge of the rack joists, and to hold the 2×6 and 2×4 in place while drilling holes for bolts.
The adjustment arms should be long enough to hold the panels horizontal, so that the panel may be adjusted through a 90 degree range from completely vertical to completely horizontal.
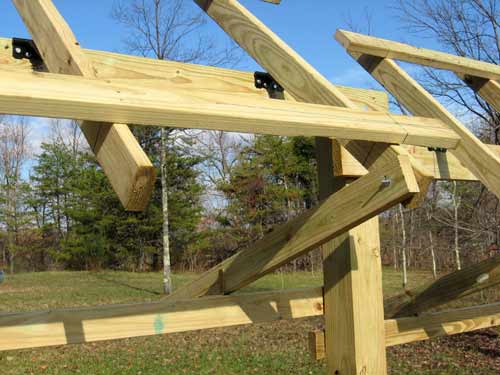
Adjustment arm
Here’s a closeup of the hinges and adjustment arm. The bolt attaching the adjustment arm to the hinged rack is tightened just enough to be snug but still allow pivoting (tighten an extra nut against the first to lock it in place). I used 1/4″ bolts to attach the adjustment arm to a 2×4 screwed to the main posts. Each time I made a seasonal adjustment I added a new hole to the adjustment arms. After the first year of operation the adjustment arms had holes in all the required places (since I drilled new holes as necessary), so I only have to remove/re-insert 2 bolts to adjust the angle (a couple minutes at most for each rack). We’ve found that we only need to adjust the angle about 4 times per year.
The panels are approximately balanced at the hinge point, so that it takes little effort to change the angle and hold the panels steady while reinserting bolts, and there is little stress on the adjustment arms due to wind loading. (note: for best balance the hingepoint should be an inch or two below the center of the vertical-esque panel joists, since the center of gravity of the panels is several inches away from the hinge line).
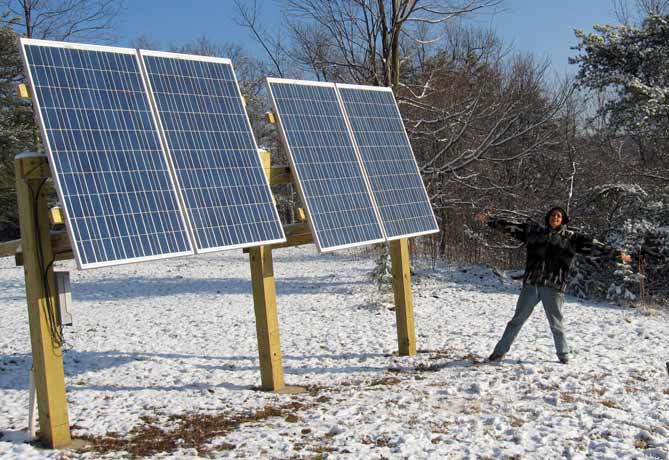
Completed panels! (adjusted for December)


WOW just what I was looking for. Came here by searching for solar
This is Awesome ! Thanks for putting this out !!
Excellent!
Many thanks for so good idea.
Thanks for sharing! This looks great. Do you have any plans with dimensions?
No, sorry. Mostly because it’s so simple – I just built it big enough to mount the specific panels I have, high enough off the ground that I can mow under them and still reach to sweep snow off. Even if I had drawn plans, your panels might be different dimensions (note that it doesn’t hurt if the racks are a little bigger than necessary).
Hey, I’m a cad guy with experiance in off grid and grid solar design, I have designed over 220,000kw. I can convert your plans to cad from scketches and or picture to professional looking plan designs. for you for free, your project is amazing!!!! if your willing to provide to families in need. My services are free, I believe what you have is a good trend. If interested in details please feel free to contact me.
Thanks, but I never drew any plans, since it is so simple. I just sized it for my panels and the nuances of the location (i.e., the slope of the hill). Also, see my reply to Don above – every installation is a little unique (number and size of panels, location) so any detailed plans would have to be adjusted anyway…
Aj Mata, were you able to put anything together on AUTOCAD design? On this project or any others? I am trying to do a tilted wall mount on a shed in my backyard and would love to see it in 3D first
how did you accurately recreate the panel hole pattern on the attaching 2×4’s? template?
I recall just using a tape measure, including diagonal measurements to insure that I had a rectanlge (rather than a parallelgram). A template would also work, but would need to be rigid. A panel could be used as a the template by drilling one hole, temporarily attaching the panel with one bolt, then using a pencil stub to mark the othe holes.
Also, the mounting holes in my panels were oblong and slightly larger than 1/4″ diameter, which allowed for a little error. Be sure to drill the holes starting on the same side of the 2×4 that the panel will attach to (if you drill from the other side the holes may be a little bit off on the mounting side due to the drill not being perfectly perpendicular.
Attachment hole locations are a concern on the panels, just thought you had a magical solution I had not considered ….. thx again.
I copied Don’s design. When making the holes to bolt the panel onto the rack I placed my panel on the rack and took a stub of a pencil to mark the oval holes in the frame of the solar panel on our wooden rack to get the exact placement of the holes. This wasn’t fast but it worked fine for our 16 panels.
What Don doesn’t talk about which is most exciting is that he powers his whole off grid home with less than 900 Watt system (four ~ 225 W panels) plus using passive solar from an attached greenhouse. People should get equally excited about ways to use less electricity as new technical ideas.
We had a friend, Bill Howley, that copied Don’s system but built his rack out of pipes and clamps. I’ll send Don a picture of Bill’s metal solar rack.
What type of connection do you have between the angle adjustment arm (handle), and the structure (2×4)? I assume it hinges and is not a fixed angle.
oops see it now!!
Yes, hinges. I adjust the panel angle about 4 times per year.
wood, including treated lumber, will change dimension as the moisture content changes. It changes according to species, some changing more than others, but the dimension aligned with the grain is fairly small – something like 1 % I think, and perhaps more importantly, some 5% at right angle to the grain. Marks’ Handbook ought to have the specifics… But the point is that the wood will change dimension more, much more, than aluminum and glass – the rack may well stress the panels and ruin them, particularly over the lifetimes involved. I’d have used steel, or better, aluminum… Meantime, hog out the holes and double-nut and leave some slack… An old engineer and former millwright who’s done it and made plenty of mistakes along the way…
Good point, though this hasn’t been a problem for us, or for anyone we know who has built racks with this design. The mounting holes in our panels are a little larger than the diameter of the bolts used, as are the bolt holes in the wood (because it’s way eaiser to fit the panels with slightly oversize holes).
Thanks for posting your design, I’m going to use it as a guideline for mine since I wanted one with an adjustable angle too. Hopefully I’ll remember to tilt the panels through their angles fully before I run the final length of the wires to be sure I have enough slack for any of the adjustment angles. It’d be just like me to snug everything up to look pretty then find out later when it’s tilted that the wires would be too tight! The angle arms are not only a nice feature but the diagonal they give will lend incredible strength to the design! Nice job, thank you! You took all the guesswork out of my head and now I have a plan and will be building one too this week 🙂
What size are the T-hinges you used and what is the weight of the panels they support?
I’m getting ready to build some of these to hang 30 panels each weighing 41 pounds (10 groups of 3).
Thanks for any advice.
Russ
The hinges are just cheap small gate hinges – a neighbor used door hinges (he rotated 2×4’s 90 degrees to accommodate the hinges, as can be seen in the additional images). Our neighbor did groups of 4 panels, but each panel had two hinges (as do our panels), so there is no problem with weight. You could probably mount a group of three panels with three hinged vertical-esque 2×4’s rather than six…
Thanks for the fast reply! It looks like you used 6×6 posts – what do you think about 4×4 posts with 2×4 ‘X’ bracing?
Russ
4×4 posts would probably be fine with the bracing, maybe even without if you don’t get a lot of wind. With the 6×6 posts we didn’t need bracing, and can easily mow beneath the panels (especially when they are adjusted for summer sun).
Great design you are a very creative dude. Curious about your solar design. What size battery Bank do you use?
Do you know what size hinges were used for the larger arrays, I have 14 panels & will mount them 2 high & 7 long. I’m looking at zinc coated T & strap hinges from National Hardware, their weight rating is kinda low… but it is for a gate install. Can you give me more details please?
I bought gate hinges from a surplus store. I don’t know of any consistent hinge ‘size’ scale or rating system, but any sturdy hinge that can be properly attached should be okay. Hinges for cupboard doors would be way to small, but medium-ish gate hinges might be strong enough if you use eight of them (assuming a 7 panel long hinge rail). Several people built racks using regular door hinges…
Hi Don,
What do you think with your same design that going to 10′ high and using 6×6 posts? I have 8 panels 65″ x 37″ and don’t want to put the on the metal roof. I don’t have a lot of room in the backyard, so the posts will be right along t to the wall of the house, so the post will have a little bit higher than the roof. Thank you for posting the design.
Tung
I think you’ll be okay if you use 6×6 posts. Our neighbor’s panels are on a hill that slopes down from east to west, so some of the posts in his installation are nearly that tall.
Thank you Don. I will be working on this project this weekend. I will send you some photographs when I get it finished.
Cheers,
Tung
Don Alejando, thank you so much for the inspiration and empowerment you have provided. I was gifted with six 240w panels for my tiny house/schoolbus village and have been at a total loss as to where to even begin to get them installed, so I really appreciate the time and talents you share. You have really been a beacon in the darkness! I have two questions: how long are the 6×6 studs, and how deep are they buried? Also, do you think that one frame could support 3 panels instead of two? I can’t wait to get started, and I will send you a photo-journal as we progress into the unknown! All the Best, Pamalama
We put the posts about two feet into the ground and filled the hole with a bag of concrete. I don’t see any reason why you couldn’t support three panels per frame, though you might want to use a 2×8 for the horizontal hinge bar that bolts to the poles.
Thank you so much!
Great looking solar rack. Noticed that in some pictures, the vertical 2×4’s are on edge while in other pics they are mounted flat. Any advantage to either? Are your hinges through bolted on the vertical 2×4’s as well as to the 2×6 lateral ?
I don’t think it makes much difference which orientation you use (either is plenty strong). I made the original rack with 2×4’s on edge, using long (2.5 inch) wood screws to secure the 2x4s to the gate hinges I used. My neighbor used reular door hinges that were better suited to the wide edge of the 2x4s (it’s easier to use bolts and nuts with the flat orientation since it would be harder to drill holes straight through when mounted on edge with the gate hinges).
Thanks so much for post these pictures and information,they have helped me greatly in my solar project,installing six 285 watt panel,using your design,Thanks again.
obNwv
Hello,Thanks again for posting,do you have any additional pictures of how you ran the ground wiring for the panels? I want to have some protection from close lightning strikes,Thanks obNwv
I copied Don’s design. When making the holes to bolt the panel onto the rack I placed my panel on the rack and took a stub of a pencil to mark the oval holes in the frame of the solar panel on our wooden rack to get the exact placement of the holes. This wasn’t fast but it worked fine for our 16 panels.
What Don doesn’t talk about which is most exciting is that he powers his whole off grid home with less than 900 Watt system (four ~ 225 W panels) plus using passive solar from an attached greenhouse. People should get equally excited about ways to use less electricity as new technical ideas.
We had a friend, Bill Howley, that copied Don’s system but built his rack out of pipes and clamps. I’ll send Don a picture of Bill’s metal solar rack.
if there are drawings I am preparing to do a 6 panel system here in the desert in Arizona, we do get wind from time to time, but would be nice to get a headstart of the frame, thanks for any input, I am grateful for the help.
There aren’t any drawings, or at least I didn’t make anything but a crude sketch to help figure out reasonable dimensions to fit our solar panels, the cheap hinges we found, and the slope of the land (which is none too level in WV – one of our neighbor’s panels in on a steep slope). Take a look at the additional photos to see design variations – you can click through to higher resolution images to see details better.
Another neighbor has just built a 4-panel rack, so I try to add a couple pictures of his racks soon…
If you want this design to last a lot of years, consider using stainless steel screws, since regular steel will rust. The posts will start to rot at ground level, so don’t allow water to pool there, especially in clay soil. It is better to have the concrete a little above ground level with the top sloped to allow water to run off away from the post. Due to possible post shrinkage, a bead of flexible concrete caulk can be placed where the concrete touches the post. The end grain on top of the post can be protected from rain, snow, or ice, by some sort of cap, such as a piece of floor tile. Lastly, check the solar panel drain holes, make sure the electrical cables are properly constrained and the solar panels are properly grounded. It should be noted that if your solar panels are high enough, sheep can mow the grass. Best of luck for the future.
If you are worried about wood warping and ruining the panels by mounting them directly to the wood (I’m not particularly), you can buy the typical L-feet and rails with clamps to mount the solar panels to and have those right on top of the wood. They are not very expensive and are lightweight and will save time measuring and bolting the holes in the panels. A design like this could be drawn up in CAD and not be super custom to panel size as there is enough overlap in cantilever distance on 60/72 cell modules.
Good design for the panels to move on a horizontal axis. I am considering a other design so that panels turn on a VERTICAL axis from morning to sunset. I believe that is more needed.
FWIW, the design shown in this post is not intended to be adjusted (or to move) throughout any individual days – in fact, we only adjust the angle seasonally (i.e., 4 times a year).
To make panels track the sun from east to west (or up and down, or both) requires some sort of relatively complex (and high maintenance) mechanism, compared to stationary panels that are adjusted seasonally. It was much cheaper (and more effective) to add a couple panels to our array than to attempt to glean a few extra watts by installing a tracking mechanism.